Monday, October 6, 2008
My Beautiful Sister
The front of the card: Prima flowers; I just can't say enough how much I love these tin flowers. The black and white pp is Classic Black, Chick flick by Luxe Designs. I can't recall who did the pink and black pp, but I really, really like it. I used Rusty Pickle rub-on for the Happy Birthday sentiment. Making Memories eyelet, and then finished it off with some complimenting pink bubble dots I had on hand.
The inside of the card: I used Kaiser Craft sentiments for the inside of the card. Where these rub-ons take more effort to get on the card, once they're there, they feel like they're part of the paper. They're completely smooth.
The envelope: I want to say the pp is from My Mind's Eye, but to be honest with you, I'm not completely sure. It came from a block stack of pp I purchased quite a while ago. The stickers for Rachel's name are from Mrs. Grossman's.
Monday, September 29, 2008
Prompt, I Am Not
I love how, when I'm making cards, each one transforms just slightly and I learn something new with each one. Simple things such as what attaches where and in what order to give the best presentation.
The materials for these cards were all in stash, so I'm only going to mention the ones I'm certain of.
Rub Ons: LOVE Rusty Pickle rub-ons. Kaiser Craft rub-ons, not so much. Both of the sentiments seen here are Rusty Pickle. I used a Kaiser Craft sentiment on the inside of one of the cards. They were just not as good of a quality, in my opinion. The Rusty Pickle ones were easier to keep in position and apply. I didn't have to guess if it was burnished on well enough, it was obvious. With the Kaiser ones, I got to burnish good and hard and long before they adhered to the card, and it wasn't obvious when they had released from their original sheet. Both brands look great once you get them on.
Prima Flowers: All the flowers here are Prima. I just ADORE the pixie tin flower brads(also Prima) used for the centers.
Brads and Eyelets: All the other brads and eyelets are from Making Memories.
Papers and Cardstock: EK Success and Basil cardstock. I'm not sure who made the other papers I used. I LOVE the fiber papers though.
Monday, August 18, 2008
Where Are All the Boys?
I made a template using Cricut Design Studio when I made the green baby card below. I used the same template on this card. I created the 3 windows on the right using the Mini Monograms cartridge. I just love the cute little baby embelies I had in my stash, which I nestled the windows of the cut outs. The paper is Marcella by Kay, which was also in my stash. Basil cardstock. The circles are cut using my Creative Memories circle cutter, and the sentiment is a cuttlebug embossing folder on white card cut with my cricut for the cute design around the edge.
Monday, August 11, 2008
A Couple More Baby Cards
I used a bit of my stash, and played with my new Cuttlebug embossing folders on these two baby cards.
Saturday, August 9, 2008
Christmas in July!
Of course while I was there I had to fit in time to pick up some things I've been wanting, that I can't easily get at home. The Cricut cartridges happened to be on sale while I was there. $40 each. Woohoo!
Time to get busy creating again! I can't wait!
Friday, July 18, 2008
And Soon I Will Be on Vacation
This is a simple layout I did of my daughter's class photos. Quite simple with a few embelishments, vellum, some tearing and a little snipping around objects on the patterned paper. If you know my DD at all, you know how fitting these papers are for her personality. Of course anything involving amimals or bugs, or flowers would pretty much capture her loves.
Thursday, June 12, 2008
...And Tomorrow Summer Vacation Begins
The last 2 thank you cards for my kids' fantastic teachers. I think it takes a special kind of person to teach children and honestly love it. And when they do, it really shows! I'm grateful to the teachers who taught my kids this year. They are all really wonderful ladies. I hope they enjoy these cards and the little gift that goes along with them.
Two Down, Two to Go
Saturday, May 31, 2008
You Can Never Have Too Many
Wednesday, May 28, 2008
Babies, Babies, Everywhere!
There are so many new babies coming into the world to people I have the privilege of knowing! You know what that means? More cards! Lots and lots of baby cards. I made these with a special someone in mind who I believe likes simple. So here they are, simple baby cards.
Tuesday, May 13, 2008
Mother's Day
I altered a box for my Mom for her gift this year. The great thing about this box is that the flower on the lower left was made by my daughter in school a few years back. It was originally a pin. So it's actually got a touch of both her and me in it's creation. My mom tells me she's going to keep the photos she's working on in it. I also made her and my MIL both cards for the occasion. My mom's is the "You" card, and my MIL's is the "Mom" card.
We took a nice walk with the kids and saw a few wild flowers, and more than a few slugs. The last photos I leave you with today, show a glimpse of Seattle wildflowers in the spring time. Even on the sunny days, there are reminders of rain.
Saturday, April 5, 2008
Nana's Birthday
My MIL's birthday is coming up in a few days. To my kids, she is Nana. I thought I'd share the card I made for her last year, as well as the one I finished up for her this year. The blue and brown card was her 07' card. The pink is the new one for this year. She's a really special person, and we miss her terribly. Have a great birthday! We love you!
Wednesday, March 19, 2008
Spring is in the air
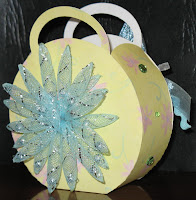
When my daughter was littler, she had this cute little headband with a big blue mesh flower. It had floating silver balls that rolled through the transparent pettals. The flower has long since fallen off. I've been holding onto it for the longest time. I decided it needed to dress up this bag. This cute pp that's been in my stash reminds me of spring so much, and went perfectly with the big blue mesh flower. I'm going to tuck some turtles into it and give it to a friend. Who can resist chocolate and caramel! Now if I can just wish spring here, we'd be all set!
Monday, March 17, 2008
Birthday Wishes
Recipe:
Green cardstock
Pink pp; Daisy Bucket Designs
Yellow pp
Fiskars embossing system
Cricut machine and Alphalicious cart
Chipboard
Brads; JoAnn
Bubble stickers; Cloud 9 Design
Rub Ons; EK Success
Copper ink pad; Dew Drop
Button
Ribbon
White marker
Pink marker
Saturday, March 15, 2008
Happy Birthday, Mom
Thursday, February 7, 2008
These cards will find homes with my son’s teachers. They’d make good any occasion cards, but this time they’ll be valentines. I used Daisy Bucket Designs patterned paper, Making Memories glitter letters and prima flowers on both cards. The squares on the smile card were from Cock-a-doodle Designs and have been in my stash for years (literally). I attached the rick-rack to the squares and hand-stitched floss around the edges. The peridot flower centers are from Dress It Up. For the Enjoy card I added faux stitching to opposing corners to balance it a bit, and made white dots in a circle around the center. Added matching glitter dots from the same stickers the sentiment came in to the upper left. The prima flower is nesting on top of heart-shaped cardstock arranged to look like petals. The center gem is Me and My Big Ideas. I really like the feel of the smile card. There are so many different textures. It’s just fun to touch.
TFL
Tuesday, February 5, 2008
Chinese New Year
Monday, February 4, 2008
An Elephant Never Forgets
Saturday, February 2, 2008
Goals
- Tidy up my desk!
- Valentines cards for teachers from my kids
- "Reflections" jar - fold the tasks, and alter the jar. (I may need a larger jar)
- Alter "Reflections" book
- Trains LO of ds#2
That should keep my plenty busy. I made a new year's resolution to do an on-going project that was all about me. Something my posterity can look back at and learn more of who I am. A journal if you will, but I intend to keep it in a scrapbook form with tons of journaling. That will be my reflections book. I found a cool message board at http://123-scrap.com. On this board, one of the projects is a Book of Me, which I figure will be a HUGE help to me for my reflections book. I'm sure there are going to be days that I'm not compelled toward a certain subject. On those days, I'll go to my jar, and pick a topic they've used for the Book of Me. I hope to do 2-3 pages in my reflections book a month all year long. I've printed the topics out on pp and cut them into strips (1 topic on each strip). I need to get them all folded up and into my jar, which I need to alter. From the looks of my cuts, I should add replacing my trimmer blade to that goal list...
Thursday, January 31, 2008
"Foiled" Challenge - Shine Like the Star U R !
Tuesday, January 29, 2008
1 Reason not to scrap at 2am
Sunday, January 27, 2008
My Stars
Simple Thank You
Saturday, January 19, 2008
Grandma's Angels
Friday, January 18, 2008
Surgery
I've been working an altered box for my oldest son that would normally have taken me one night. Because of my current state, I've been working on it here and there for a few minutes at a time. I've almost finished the lid. I hope to have it finished and posted here soon. In the mean time, I have a previous project that I did for my mom for Christmas that I'll post shortly.
Friday, January 11, 2008
Christina's Card
This is a card I made for my friend who is moving out of state. The finished card is about 5x8”.
The Letters were all cut using my Cricut, and the Jasmine cartridge. The large C is the charm function cut at 4.5”. For this charm I made chip board using a piece of cardboard that came with some scrapbook sheet protectors that I had, with a colored paper mounted to it. “My friend” was cut at 1 ½ ”. The tag was cut at 2” and 1 ¾” from the Plantin SchoolBook cartridge. The paper is all “Magnolia” from My Mind’s Eye. The ribbon was bulk ribbon from Ben Franklin Craft that I had left over from a card I made my mother-in-law for her birthday. The brad is Making Memories. I believe the flower charm is also, although I’m not sure. I used Walnut Ink from Tsukinek for the antiquing around the edges.
The sentiment on the inside of the card was printed on my printer. I cut out some of the shapes from one of the coordinating papers used on the front of the card, and spiced up the inside a bit. I also made an envelope for the card with this same paper.